

Table of Contents
Introduction: Festive Christmas Tree Cheesecake Brownies
The Perfect Holiday Treat
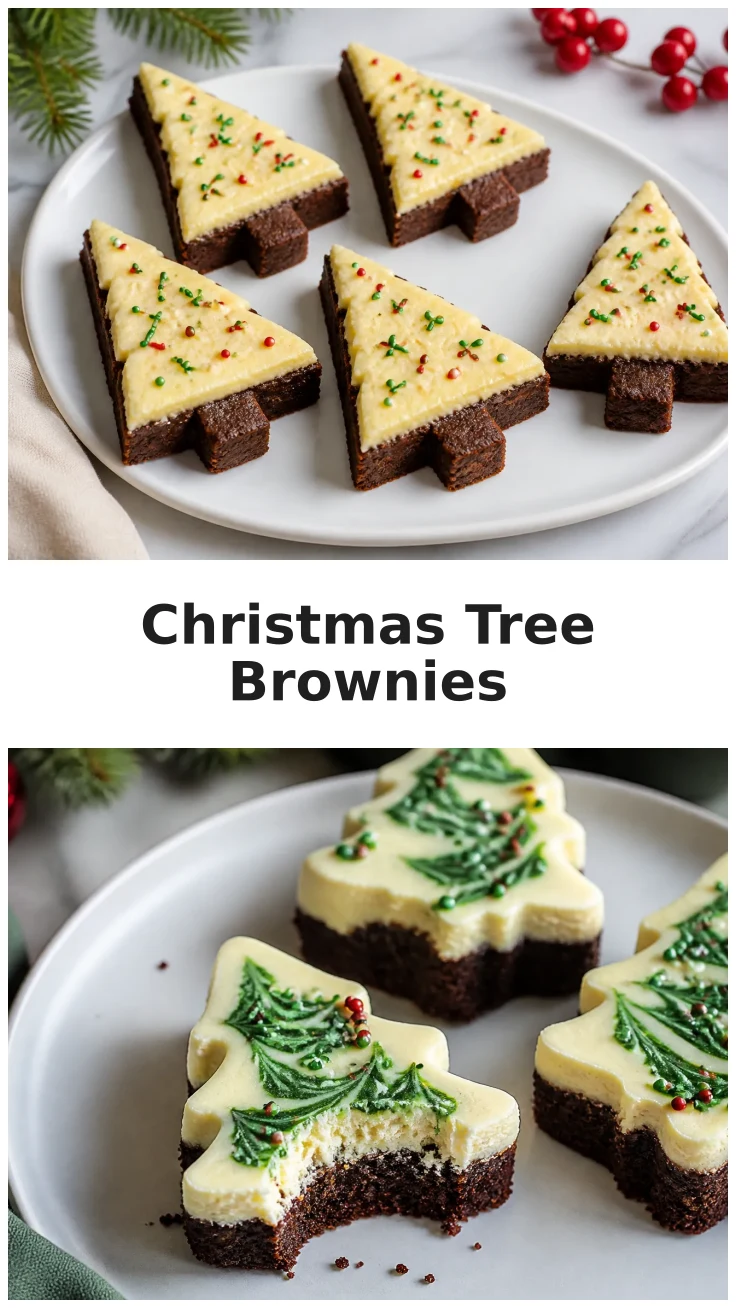
As the holiday season approaches, many of us find ourselves searching for the perfect dessert to delight family and friends. Enter the Christmas Tree Cheesecake Brownies—a whimsical and delicious treat that beautifully combines the rich, fudgy goodness of brownies with the creamy, tangy flavor of cheesecake. Not only do these brownies taste incredible, but they also bring a festive flair to any dessert table with their charming Christmas tree design. This recipe is sure to be a hit at any holiday gathering, bringing smiles and joy to everyone who takes a bite. For more inspiration, check out Pecan Pie Brownies.
Why You’ll Love This Recipe
These Christmas Tree Cheesecake Brownies are more than just visually appealing. They are a delightful blend of textures and flavors, with a moist and chewy brownie base topped with a smooth and creamy cheesecake layer. The added bonus of festive decorations makes them an ideal centerpiece for your holiday dessert spread. Whether you’re hosting a Christmas party or simply want to treat your family to something special, this recipe is easy to follow and yields impressive results. Plus, it’s a great opportunity to get creative with decorations, making it a fun activity for both kids and adults alike.

Love easy home cooking like this? 🍔
Get simple American recipes, quick dinners and homemade desserts in your inbox every week. Free, no spam, unsubscribe anytime. See our Privacy Policy.
Ingredients
Brownie Base Ingredients
To create the perfect brownie base, you’ll need a few staple ingredients that are likely already in your pantry. This rich and fudgy foundation is key to making a dessert that’s both delicious and structurally sound for the cheesecake layer on top.
- 1 cup unsalted butter, melted
- 2 cups granulated sugar
- 1 cup all-purpose flour
- 1 cup unsweetened cocoa powder
- 1/2 tsp salt
- 4 large eggs
- 1 tsp vanilla extract
Cheesecake Layer Ingredients
The creamy cheesecake layer adds a delightful contrast to the dense brownie base. Make sure to use room temperature ingredients for the smoothest cheesecake mixture.
- 16 oz cream cheese, softened
- 1/2 cup granulated sugar
- 2 large eggs
- 1 tsp vanilla extract
- Green food coloring, as needed
Decorative Toppings
Transform your cheesecake brownies into festive Christmas trees with these colorful toppings. Feel free to get creative and add any additional decorations you like.
- Mini pretzel sticks (for tree trunks)
- Assorted sprinkles
- M&M’s or similar candy (for ornaments)
- Powdered sugar (optional, for snowfall effect)
Step-by-Step Instructions
Preparing the Brownie Base
Start by preheating your oven to 350°F. In a large mixing bowl, combine melted butter and sugar, whisking until well blended. Add in the eggs, one at a time, mixing well after each addition, then stir in the vanilla extract. In a separate bowl, sift together the flour, cocoa powder, and salt. Gradually add the dry ingredients to the wet mixture, stirring until just combined. Be careful not to overmix, as this can lead to tougher brownies. Pour the batter into a greased 9×13 inch baking pan and spread evenly.
Making the Cheesecake Layer
In another bowl, beat the cream cheese and sugar together until smooth and creamy. Add in the eggs and vanilla extract, mixing until fully incorporated. Add a few drops of green food coloring and blend until you reach your desired shade. Carefully spread the cheesecake mixture over the brownie base, ensuring an even layer.
Assembling and Baking
With both layers prepared, it’s time to bake. Place the pan in the preheated oven and bake for 45-50 minutes, or until the cheesecake layer is set and slightly golden around the edges. To check for doneness, insert a toothpick into the center; it should come out mostly clean with a few moist crumbs. Once baked, allow the brownies to cool completely in the pan on a wire rack.
Decorating Your Christmas Trees
Once cooled, cut the brownies into triangles to form the shape of Christmas trees. Insert a mini pretzel stick into the base of each triangle to create the tree trunk. Decorate with sprinkles, candies, and a dusting of powdered sugar to resemble snow. Let your creativity shine by making each tree unique!
Pro Tips
Creating the perfect Christmas Tree Cheesecake Brownies is a breeze with these helpful tips. Whether you’re a seasoned baker or a novice, these suggestions will ensure your treats turn out beautifully every time.
- Ensuring a Moist Brownie Base: Use room temperature eggs to help the batter emulsify better, resulting in a more cohesive and moist brownie.
- Achieving a Smooth Cheesecake Layer: Make sure all your cheesecake ingredients are at room temperature before mixing to avoid lumps and achieve a silky consistency.
- Creative Decoration Ideas: Experiment with different candy colors and shapes to make your Christmas trees truly stand out. Consider using edible glitter for an extra festive touch.
- Storage Tips: Store your brownies in an airtight container in the refrigerator to keep them fresh and delicious for up to a week.
One of the most important tips is to be patient and let the brownies cool completely before cutting and decorating. This ensures clean cuts and prevents the cheesecake layer from sliding off.
Love easy home cooking like this? 🍔
Get simple American recipes, quick dinners and homemade desserts in your inbox every week. Free, no spam, unsubscribe anytime. See our Privacy Policy.
Serving Suggestions
Pairing with Holiday Beverages
These festive brownies are perfect when paired with a variety of holiday beverages. Consider serving them with a warm mug of hot cocoa, a spiced apple cider, or even a classic eggnog. The rich flavors of the brownies complement the cozy warmth of these drinks, making for a delightful winter treat.
Perfect Occasions for Serving
Christmas Tree Cheesecake Brownies are a versatile dessert, suitable for a range of holiday occasions. Serve them at your next holiday party, bring them to a festive potluck, or even include them in a holiday dessert buffet. These brownies also make a great gift when packaged in a festive box, allowing your loved ones to enjoy a slice of holiday cheer.
Nutritional Information
Caloric Content and Serving Size
Each slice of these delightful brownies contains approximately 320 calories. This dessert is rich and satisfying, making it a perfect indulgence during the holiday season. Remember, moderation is key, so enjoy each piece mindfully.
Macronutrient Breakdown
The macronutrient breakdown per slice includes 48g of carbohydrates, 5g of protein, and 13g of fat. The balance of carbohydrates and fats makes these brownies a satisfying treat that provides a quick energy boost, ideal for busy holiday gatherings.
Conclusion
In conclusion, the Christmas Tree Cheesecake Brownies are a festive and delightful addition to any holiday gathering. With their rich brownie base, creamy cheesecake layer, and playful decorations, they are sure to impress both visually and gastronomically. Whether you’re an experienced baker or just starting out, this recipe is simple to follow and yields spectacular results. Enjoy making these treats with family and let the festive spirit fill your home with joy and delicious aromas. Happy baking!


Christmas Tree Cheesecake Brownies

Equipment
- 1 9×13 inch baking pan greased
- 1 electric mixer
- 1 mixing bowl large
Ingredients
Brownie Base
- 1 cup unsalted butter melted
- 2 cups granulated sugar
- 1 cup all-purpose flour
- 1 cup unsweetened cocoa powder
- 1/2 tsp salt
- 4 large eggs
- 1 tsp vanilla extract
Cheesecake Layer
- 16 oz cream cheese softened
- 1/2 cup granulated sugar
- 2 large eggs
- 1 tsp vanilla extract
- Green food coloring as needed
Decorative Toppings
- Mini pretzel sticks
- Assorted sprinkles
- M&M’s or similar candy
- Powdered sugar optional
Instructions
Preparation
- Preheat the oven to 350°F. In a large mixing bowl, combine melted butter and granulated sugar. Whisk in the eggs one at a time, followed by the vanilla extract. Sift together flour, cocoa powder, and salt, then gradually incorporate into the wet ingredients. Pour the batter into a greased 9×13 inch baking pan.
- In a separate bowl, beat together cream cheese and sugar until smooth. Add the eggs and vanilla extract, mixing until incorporated. Stir in green food coloring until desired color is achieved. Spread over the brownie base.
- Bake in the preheated oven for 45-50 minutes, or until the cheesecake layer is set and slightly golden at the edges. Allow to cool completely in the pan on a wire rack.
- Once cooled, cut the brownies into triangles to form tree shapes. Insert a pretzel stick into the base of each triangle as the tree trunk. Decorate with sprinkles, candies, and powdered sugar.
Serving
- Arrange the decorated brownie trees on a serving platter. Pair with holiday beverages like hot cocoa or spiced cider for a festive treat.
Storage
- Store the brownies in an airtight container in the refrigerator for up to a week. For best freshness, avoid direct exposure to air for prolonged periods.
Notes
Ingredient Substitutions: Use dark chocolate chips instead of cocoa powder for a richer flavor.
How to Serve: Pair with hot beverages like cocoa or coffee.
Storage & Freshness: Keep in an airtight container in the fridge.
Make-Ahead Tips: Prepare the day before and decorate just before serving.
FAQ
Can I make these brownies ahead of time?
Yes, you can prepare the Christmas Tree Cheesecake Brownies a day or two in advance. After baking and cooling, store them in an airtight container in the refrigerator. Decorate them just before serving to ensure the decorations remain fresh and vibrant. This makes them a convenient option for holiday parties and gatherings.
What can I use if I don’t have green food coloring?
If you don’t have green food coloring, you can create a natural green tint by using matcha powder or spinach juice. These alternatives provide a subtle green hue. Another option is to leave the cheesecake layer its natural color and focus on decorating with green sprinkles and candies to achieve the Christmas tree effect.
Enjoyed this recipe? Leave a review!
There are no reviews yet. Be the first one to write one.

